
ML App With Streamlit In 9 Super Short Steps
Sep 25, 2023
Ready to share your ML work with a fast and elegant ML app?
If you are a data science/machine learning engineer developing projects inside a Jupyter notebook and uploading them to Github, you’ve probably noticed the world rarely finds them. And you’ve put too much into them to let them go unnoticed, haven’t you?

What if I told you there was a better way to:
👉🏽 Showcase your projects to larger audiences,
👉🏽 Put your work in front of more people’s eyes,
and all that with minimal changes to our existing python scripts and Jupyter notebooks?
I know you love Jupyter notebooks, but let’s face it: if you want your work to have a positive impact on people, both tech-savvy and not so savvy, notebooks are not the best way to do it. Streamlit is ❤️.

What is Streamlit?
Streamlit is an open-source Python library that lets you transform any python script into an interactive web app, with a few lines of code.
On top of that, Streamlit offers a free hosting service, called Streamlit Cloud, where you can deploy your apps from Github with just a few clicks.
In the next section, I will show you how I transformed this Jupyter notebook
into this live webapp.
Create and deploy a web app in 9 super-short steps
A few months ago I published a hands-on tutorial on adversarial examples. I even had the honor to share this work at the Developer Week conference, in front of a mixed audience of ML specialists and non-specialists.
Adversarial examples are malicious images, designed by an attacker, with the intention to confuse an image recognition ML model. Their existence represents a security threat and hampers the applicability of machine learning models in mission-critical jobs, like self-driving cars.
If you want to know more I recommend you read my article here.
To showcase my work I created this Jupyter notebook.
As most Jupyter notebooks, it consists of 3 steps:
1. Read input parameters
These are usually defined at the beginning of your notebook.
| # original image | |
| url = 'https://github.com/Paulescu/adversarial-machine-learning/blob/main/images/dog.jpg?raw=true' | |
| # FGSM parameters | |
| epsilon = 0.09 | |
| n_steps = 9 | |
| alpha = 0.025 |
2. Processing steps
These are function calls that, given the inputs, compute intermediate outputs, as well as the final outputs. For example, in my case, there are 3 functions to:
- load the image from the URL into memory.
- load the
inception-v3model from PyTorch hub. This is the model I am trying to fool with my adversarial examples. - implement the FGSM method.
| # function 1 | |
| # load image from the given url | |
| response = requests.get(url) | |
| img = Image.open(io.BytesIO(response.content)) | |
| # function 2 | |
| # load model. This is a time-consuming operation | |
| model = load_model() | |
| # function 3 | |
| # returns a pair (x_adv, grad) after each FGSM step. | |
| iterator = iterative_fast_gradient_sign_( | |
| model, | |
| preprocess(img), | |
| epsilon, | |
| n_steps=n_steps, | |
| alpha=alpha | |
| ) |
3. Print out results.
In my case, I plot the potential adversarial examples generated by the FGSM method above.
| for x_adv, grad in iterator: | |
| # get model predictions | |
| x_adv_predictions = predict(model, x_adv) | |
| plot(x_original, x_adv, grad, epsilon, | |
| x_label=x_predictions['label'], | |
| x_prob=x_predictions['confidence'], | |
| x_adv_label=x_adv_predictions['label'], | |
| x_adv_prob=x_adv_predictions['confidence']) | |
| # starting image new iteration | |
| x_original = x_adv | |
| x_predictions = predict(model, x_original) |
All in all, this is what the entire python code, including all imports, looks like:
| import io | |
| import requests | |
| from PIL import Image | |
| # own imports | |
| from src.model import load_model, preprocess, predict, inverse_preprocess | |
| from src.fgsm import iterative_fast_gradient_sign_ | |
| from src.viz import plot | |
| # ------------------------------------------------------------------------------ | |
| # 1. PARAMETERS | |
| # load image from a given url | |
| url = 'https://github.com/Paulescu/adversarial-machine-learning/blob/main/images/dog.jpg?raw=true' | |
| # FGSM parameters | |
| epsilon = 0.09 | |
| n_steps = 9 | |
| alpha = 0.025 | |
| # ------------------------------------------------------------------------------ | |
| # ------------------------------------------------------------------------------ | |
| # 2. PROCESSING | |
| # load image from the given url | |
| response = requests.get(url) | |
| img = Image.open(io.BytesIO(response.content)) | |
| # load model. This is a time-consuming operation | |
| model = load_model() | |
| # make sure the image from URL is clean, and the model correctly classifies it. | |
| # preprocess original image | |
| x_original = inverse_preprocess(preprocess(img)) | |
| # and make sure the model predicts the correct label | |
| x_predictions = predict(model, x_original) | |
| print(x_predictions) | |
| # returns a pair (x_adv, grad) after each FGSM step. | |
| iterator = iterative_fast_gradient_sign_( | |
| model, | |
| preprocess(img), | |
| epsilon, | |
| n_steps=n_steps, | |
| alpha=alpha | |
| ) | |
| # ------------------------------------------------------------------------------ | |
| # ------------------------------------------------------------------------------ | |
| # 3. PLOT RESULTS | |
| for x_adv, grad in iterator: | |
| # get model predictions | |
| x_adv_predictions = predict(model, x_adv) | |
| plot(x_original, x_adv, grad, epsilon, | |
| x_label=x_predictions['label'], | |
| x_prob=x_predictions['confidence'], | |
| x_adv_label=x_adv_predictions['label'], | |
| x_adv_prob=x_adv_predictions['confidence']) | |
| # starting image new iteration | |
| x_original = x_adv | |
| x_predictions = predict(model, x_original) | |
| # ------------------------------------------------------------------------------ |
I believe that 99.9% of Jupyter notebooks can be structured like this, so the refactorings I will go through are applicable to your case.
These are the 9 steps I followed:
Step 1. Import Streamlit
Add the Streamlit package to your Python environment
| pip install streamlit |
and import it to your python script.
| import streamlit as st |
Step 2. Create a widget for each input parameter
These are the widgets I used:
st.text_inputwidget for the URLst.sliderfor the floating parametersepsilonandalphast.number_inputfor the integer parametern_steps
As I wanted to have the FGSM parameters widgets on a left-hand sidebar, I created them as st.sidebar.sliders and st.sidebar.number_input.
| # st.text_input to read url from text box. | |
| default_url = 'https://github.com/Paulescu/adversarial-machine-learning/blob/main/images/dog.jpg?raw=true' | |
| url = st.text_input('Introduce URL of the initial image 👇🏼', default_url) | |
| # FGSM parameters | |
| # st.slider to select parameter within fixed ranges. | |
| # by adding 'sidebar' you get the sliders on a sidebar menu on the left of the screen. | |
| epsilon = st.sidebar.slider('Step size', min_value=0.0, max_value=0.25, | |
| step=0.01, value=0.09, format="%.3f") | |
| alpha = st.sidebar.slider('Max perturbation', min_value=0.00, max_value=0.250, | |
| step=0.001, value=0.025, format="%.3f") | |
| n_steps = st.sidebar.number_input('Number of steps', step=1, min_value=1, | |
| max_value=50, value=9) |
Step 3. Cache processing functions
To make your web app much faster and more responsive, you should decorate your processing functions with @st.cache
This way, when the user updates a parameter through a widget, Streamlit will only re-execute the functions whose inputs have changed, and leave the rest untouched.
| @st.cache | |
| def fetch_image(url): | |
| response = requests.get(url) | |
| x = Image.open(io.BytesIO(response.content)) | |
| x = inverse_preprocess(preprocess(x)) | |
| return x | |
| img = fetch_image(url) | |
| @st.cache | |
| def load_model_(): | |
| return load_model() | |
| model = load_model_() |
Step 4. Plot results
Plotting images is as easy as calling st.image:
| for x_adv, grad in iterator: | |
| st.markdown(f'## Step {counter}') | |
| # get model predictions | |
| prediction_adv = predict(model, x_adv) | |
| # print them | |
| caption_adv = f'= {prediction_adv["label"]} \n {prediction_adv["confidence"]:.0%}' | |
| st.image([x_adv, grad, x_adv], width=image_width, caption=['', f'* {epsilon}', caption_adv], output_format='JPEG') | |
| counter += 1 |
Step 5. Final touches
You can easily add text elements like
- main title
| st.title('Adversarial example generator') |
- markdown formated text to the frontend, to help the user navigate your app
| doc_markdown = """ | |
| ## What are adversarial examples? 💡 | |
| 👉🏽 Do you think it is impossible to fool the vision system of a self-driving Tesla car? | |
| 👉🏽 Or that machine learning models used in malware detection software are too good to be evaded by hackers? | |
| 👉🏽 Or that face recognition systems in airports are bulletproof? | |
| Like any of us machine learning enthusiasts, you might fall into the trap of thinking that deep models used out there are perfect. | |
| ### Well, you are WRONG. | |
| There are easy ways to build **adversarial examples** that can fool any deep learning model and create security issues. | |
| With this app you can create your own adversarial examples, using the **Iterative Fast Gradient Sign Method**, and fool [`Inception-v3`](https://en.wikipedia.org/wiki/Inceptionv3) | |
| """ | |
| st.markdown(doc_markdown) |
- or a sidebar title where the parameter widgets are
You can check all available text elements, including LaTeX and code blocks, in the Streamlit documentation.
To see the web app on your local machine you run:
| streamlit run <PATH_TO_YOUR_PY_FILE> |
Now it is time to deploy your app, so the whole world can use it.
Step 6. Generate a requirements.txt file
You need to have a file in your GitHub repo with the list of Python dependencies in your code. These are the packages that Streamlit Cloud will need to deploy your web app.
You can either generate the good-old requirements.txt file, as follows:
| pip freeze > requirements.txt |
Or, if you use a tool like Poetry to package your Python code (like I do), you can use the existingpyproject.toml file.
Step 7. Push to Github
You need to have the code committed in a public GitHub repository, like this.
Hence, add all relevant files to git and push the code to the remote branch:
| git push -u origin main |
Step 8. Sign up for Streamlit Cloud
This is a one-time thing.
Sign up to Streamlit Cloud here and choose the FREE plan.
With this plan, you can deploy an unlimited number of public apps. Amazing, isn’t it?
Step 9. Deploy your app
Go to your Streamlit Cloud space, and click on the New app button

Then, you paste the GitHub URL of the python file with the Streamlit app and click Deploy!.
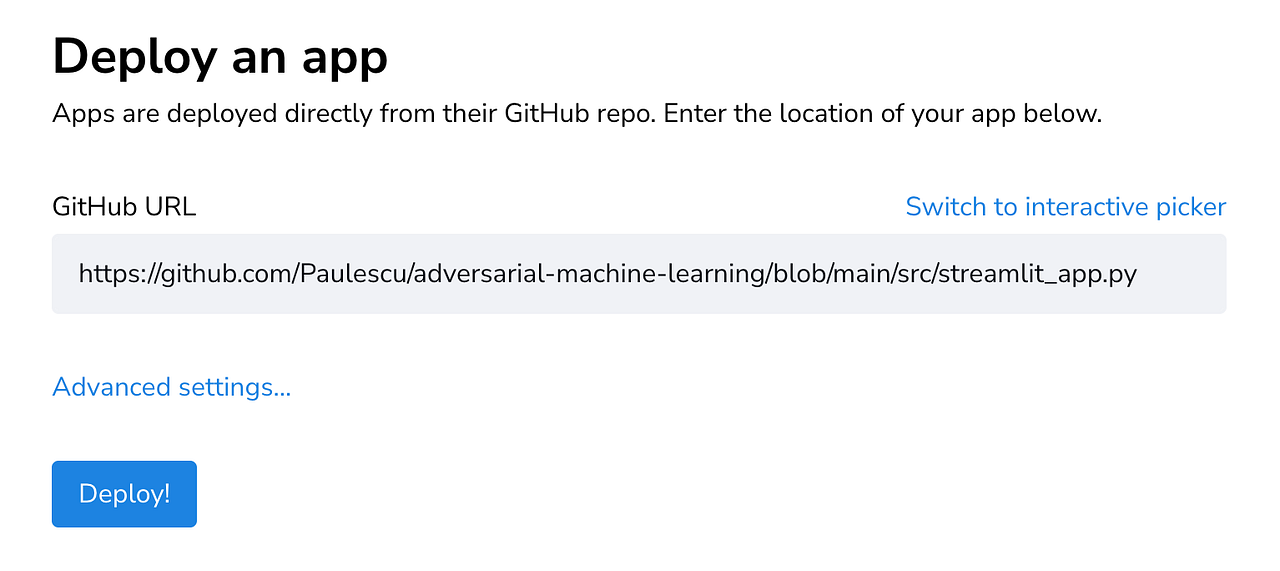
You wait a couple of minutes, and voila!

Now it is your turn!
Sharing your work with more people is beneficial to everyone, especially you. And with Streamlit you can accomplish this with minimum effort.
I am looking forward to seeing what you can build!
Have a great day 🧡❤️💙
