Build a production-ready ML dashboard with Streamlit and Docker
Feb 22, 2024
Let me show you step-by-step, how to build a production-ready dashboard using Streamlit and Docker.
Hands-on example 👩🏻💻🧑🏽💻
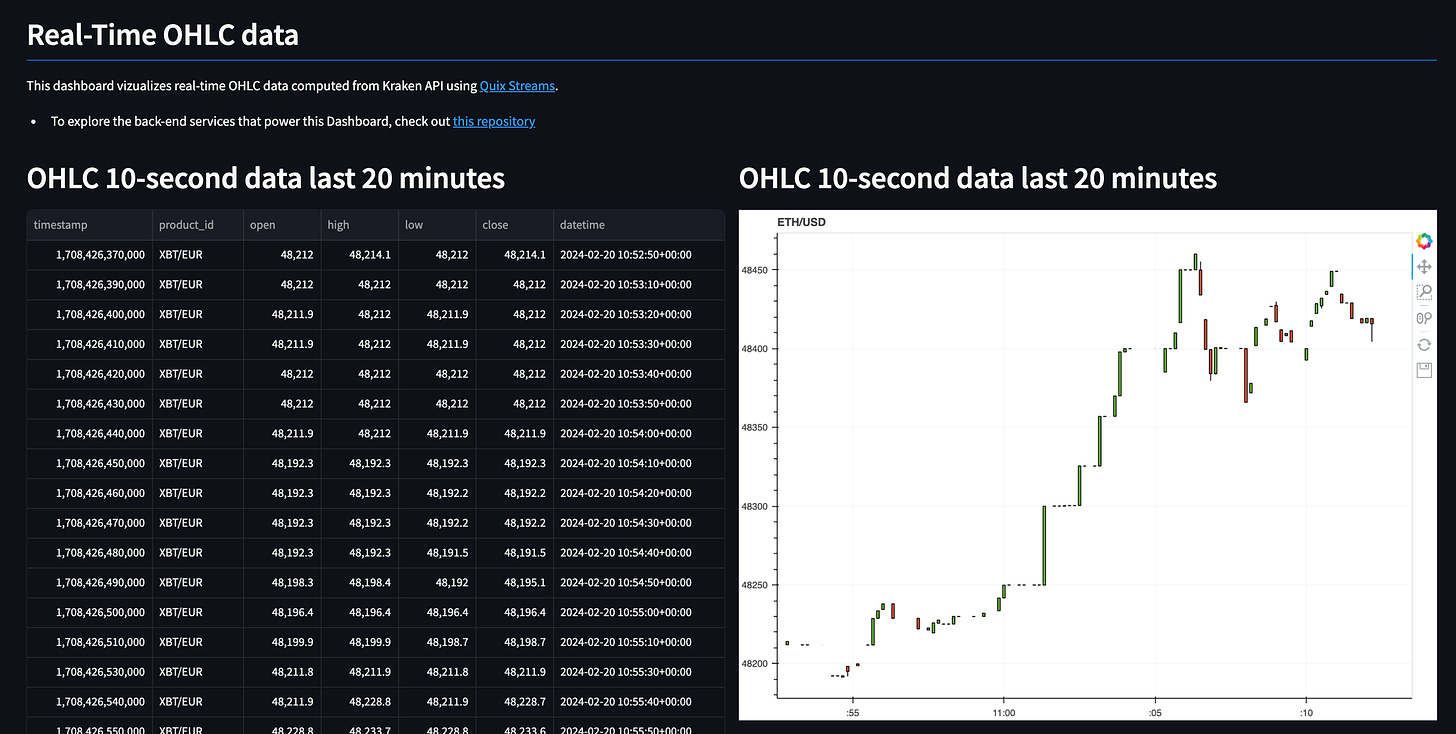
In this tutorial we will build a web app that plots crypto-currency Open-High-Low-Close data (aka OHLC) every 10 seconds.
We will use the following tools:
-
Streamlit to build our frontend-app using pure Python, without having to learn any JavaScript 🎉
-
Python Poetry to package our Python code professionally 😎, and
-
Docker to containerize our web app, and ease the deployment to a production-environment 📦
Where is the data coming from? 📊
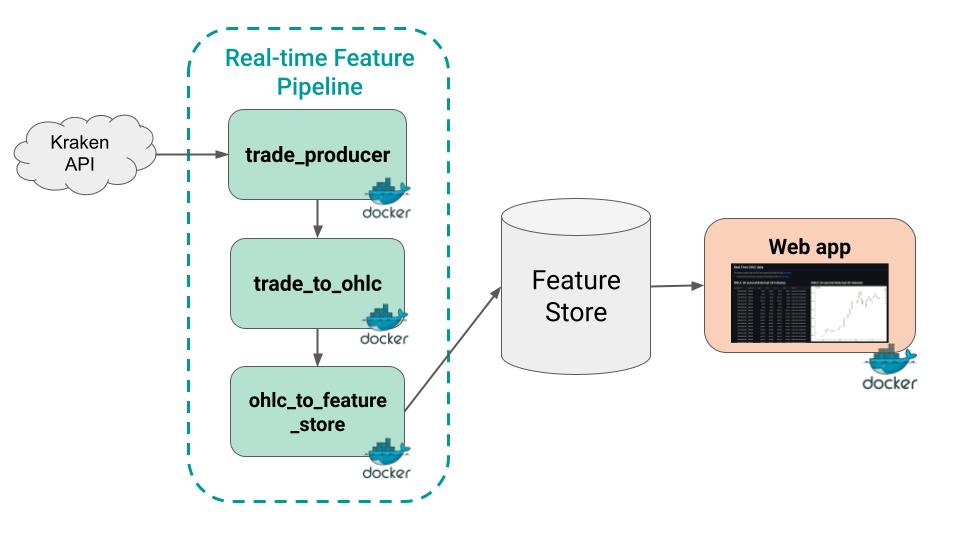
This web app does not plot a static dataset, but live data generated by a real-time feature pipeline that
Ingests raw trades from the Kraken API
Transforms these raw trades into 10-second OHLC data, and
Saves these features in a Feature Store.
If you want to learn how to build and deploy the feature pipeline, check this previous blog post with full source-code
Without further ado, let’s get to it!
Wanna get more real-world MLOps videos for FREE?
→ Subscribe to the Real-World ML Youtube channel ←
Steps
You can find all the source code in this repository
→ Give it a star ⭐ on Github to support my work 🙏
These are the 4 steps to build a production-ready ML dashboard.
Step 1. Create the project structure
We will use Python Poetry to create our ML project structure. You can install it for free in your system with a one-liner.
$ curl -sSL https://install.python-poetry.org | python3 -Once installed, go to the command line and type
$ poetry new dashboard --name srcto generate the following folder structure
dashboard
├── README.md
├── src
│   └── __init__.py
├── pyproject.toml
└── tests
    └── __init__.py
Then type
$ cd dashboard && poetry installto create your virtual environment and install your local package src in editable mode.
Step 2. Build the UI with Streamlit
Install the Streamlit library inside your virtual environment
$ poetry add streamlitand then add a main.py file to define the web app components.
dashboard
├── README.md
├── main.py
├── src
│   └── __init__.py
├── pyproject.toml
└── tests
    └── __init__.py
At the top of your main.py you need to import
-
Of course Streamlit
import streamlit as st -
Any third-party libraries your code needs, for example
import pandas as pd -
Local dependencies from your
srcfolder (more on this in the next section)from src.backend import get_features
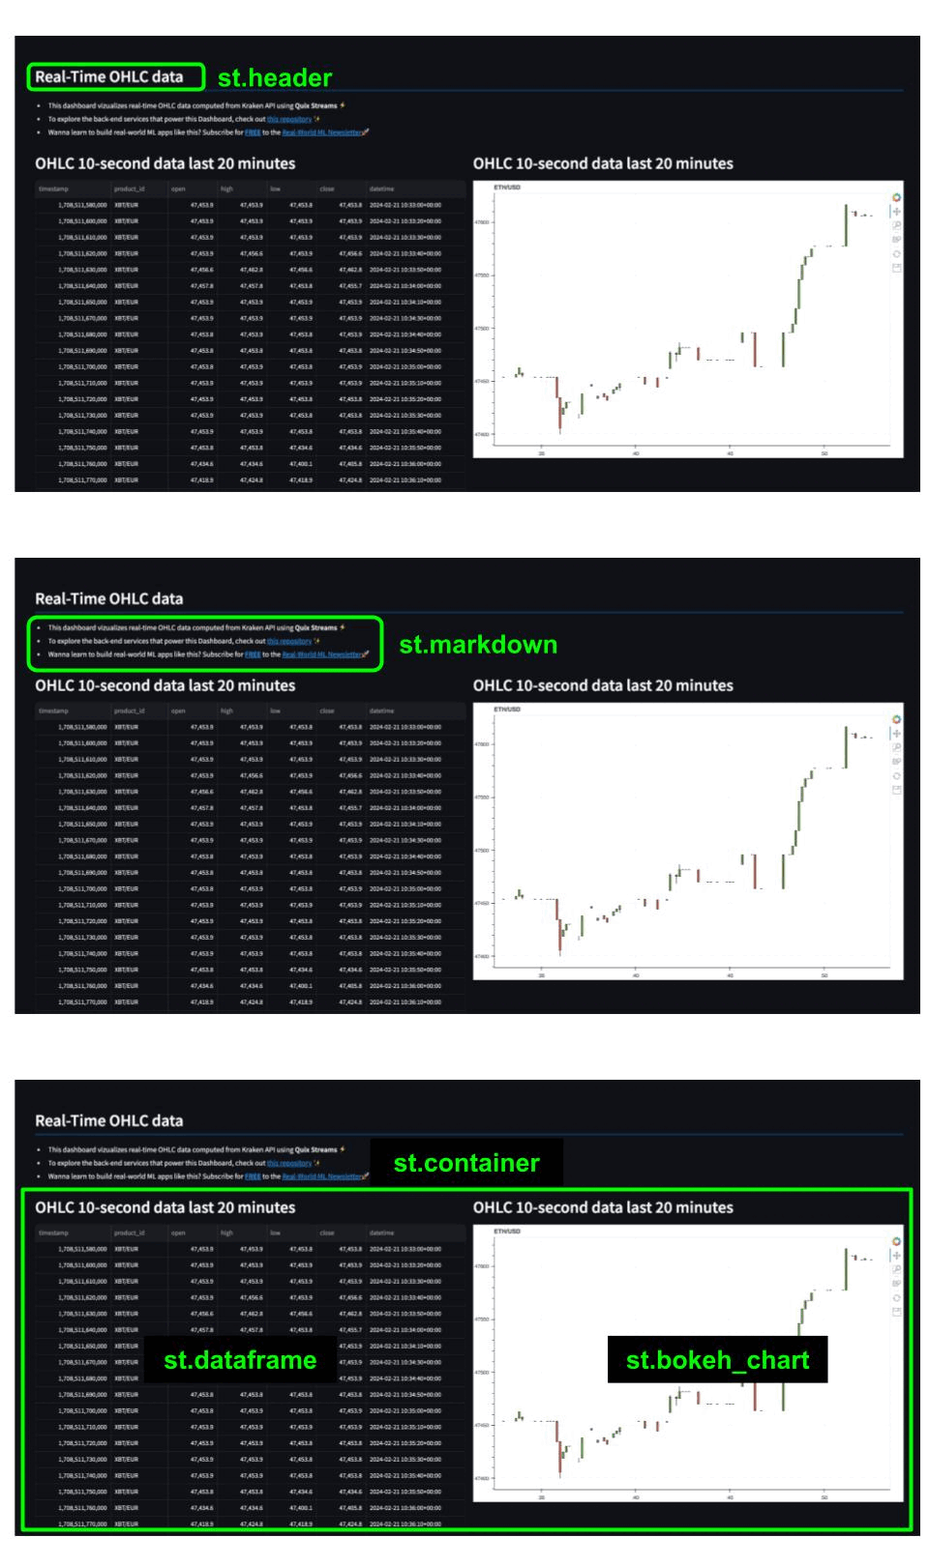
Then, you start building the UI using the Streamlit API. For example, you can add
-
a title with
st.header -
a markdown block with
st.markdown -
a table widget with
st.dataframe -
a Bokeh chart with
st.bokeh_chart
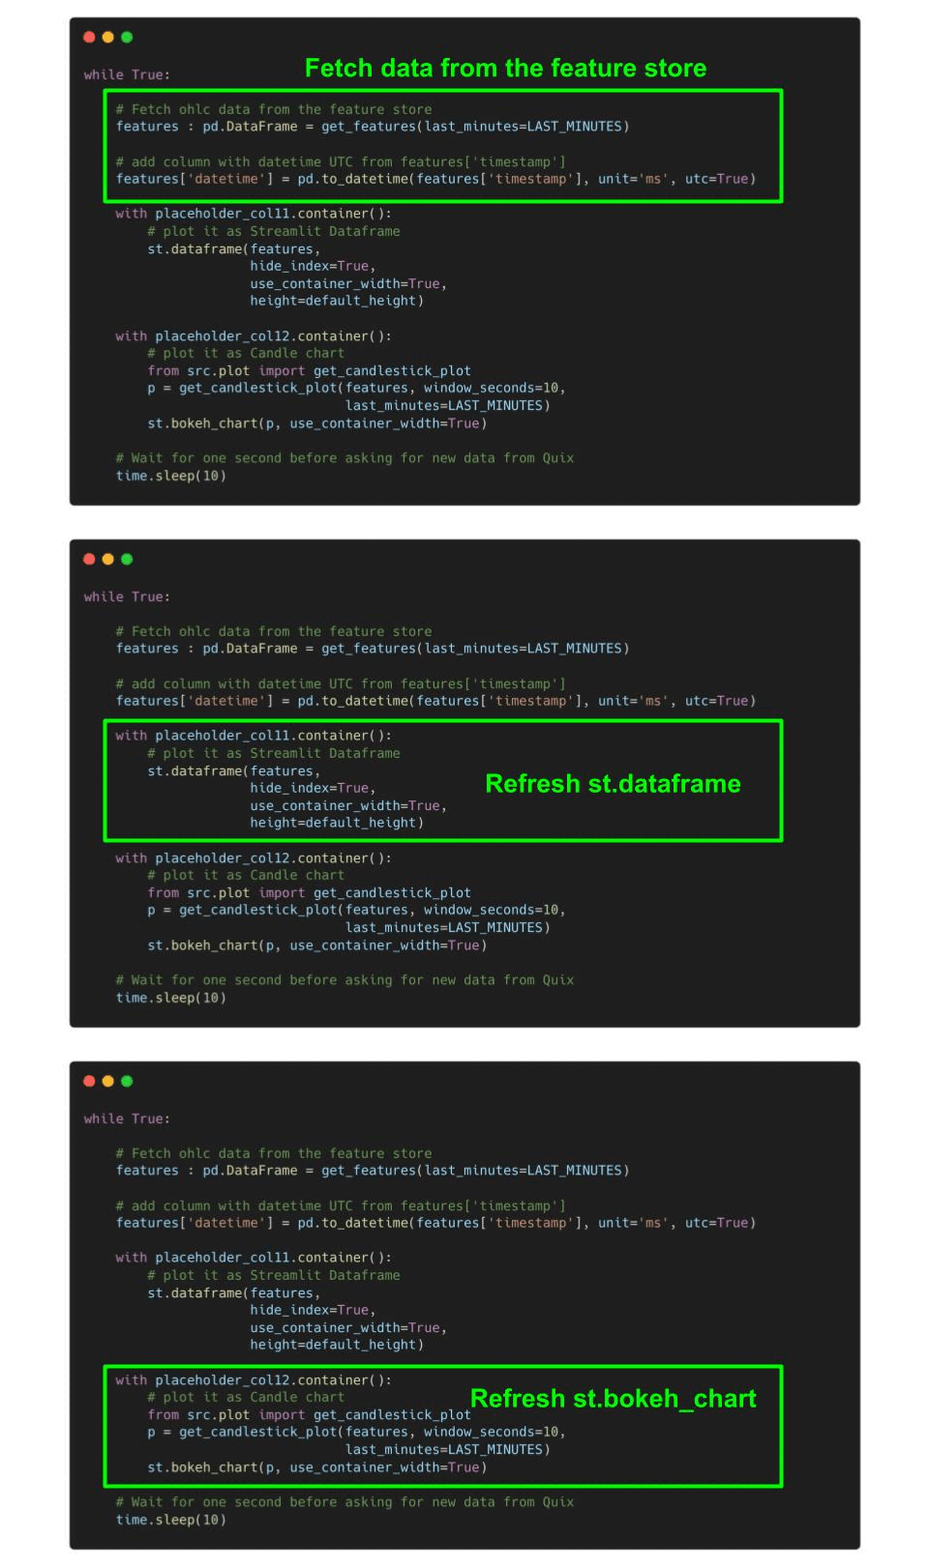
We then add a while True loop, to periodically
-
call the get_features() function to fetch the data from the feature store, and
-
refresh the widgets’ content
Step 3. Extract non UI functionality into separate files
It is best practice to keep your Streamlit app in main.py as lightweight as possible, and define non UI logic in separate .py files. This way your code is modular and easier to test.
In this case, our get_features() function is defined in src/backend.py, which in turns uses the src/feature_store_api.py to handle low-level communication with the feature store.
dashboard
├── README.md
├── main.py
├── poetry.lock
├── pyproject.toml
├── src
│   ├── __init__.py
│   ├── backend.py
│   ├── feature_store_api
│   │   └── ...
│   ├── plot.py
│   └── utils.py
└── tests
    └── __init__.py
At this point, you can run your web app by going to the terminal and typing
$ poetry run streamlit run main.py --server.runOnSave true
Step 4. Dockerize the web app
So far you have a working web app locally. However, to make sure your app will work once deployed in a production environment, like a Kubernetes Cluster, you need to dockerize it.
For that, you need to add a Dockerfile to your repo
dashboard
├── Dockerfile
├── README.md
├── main.py
├── poetry.lock
├── pyproject.toml
├── src
│   └── ...
└── tests
    └── __init__.py
with the following layered instructions
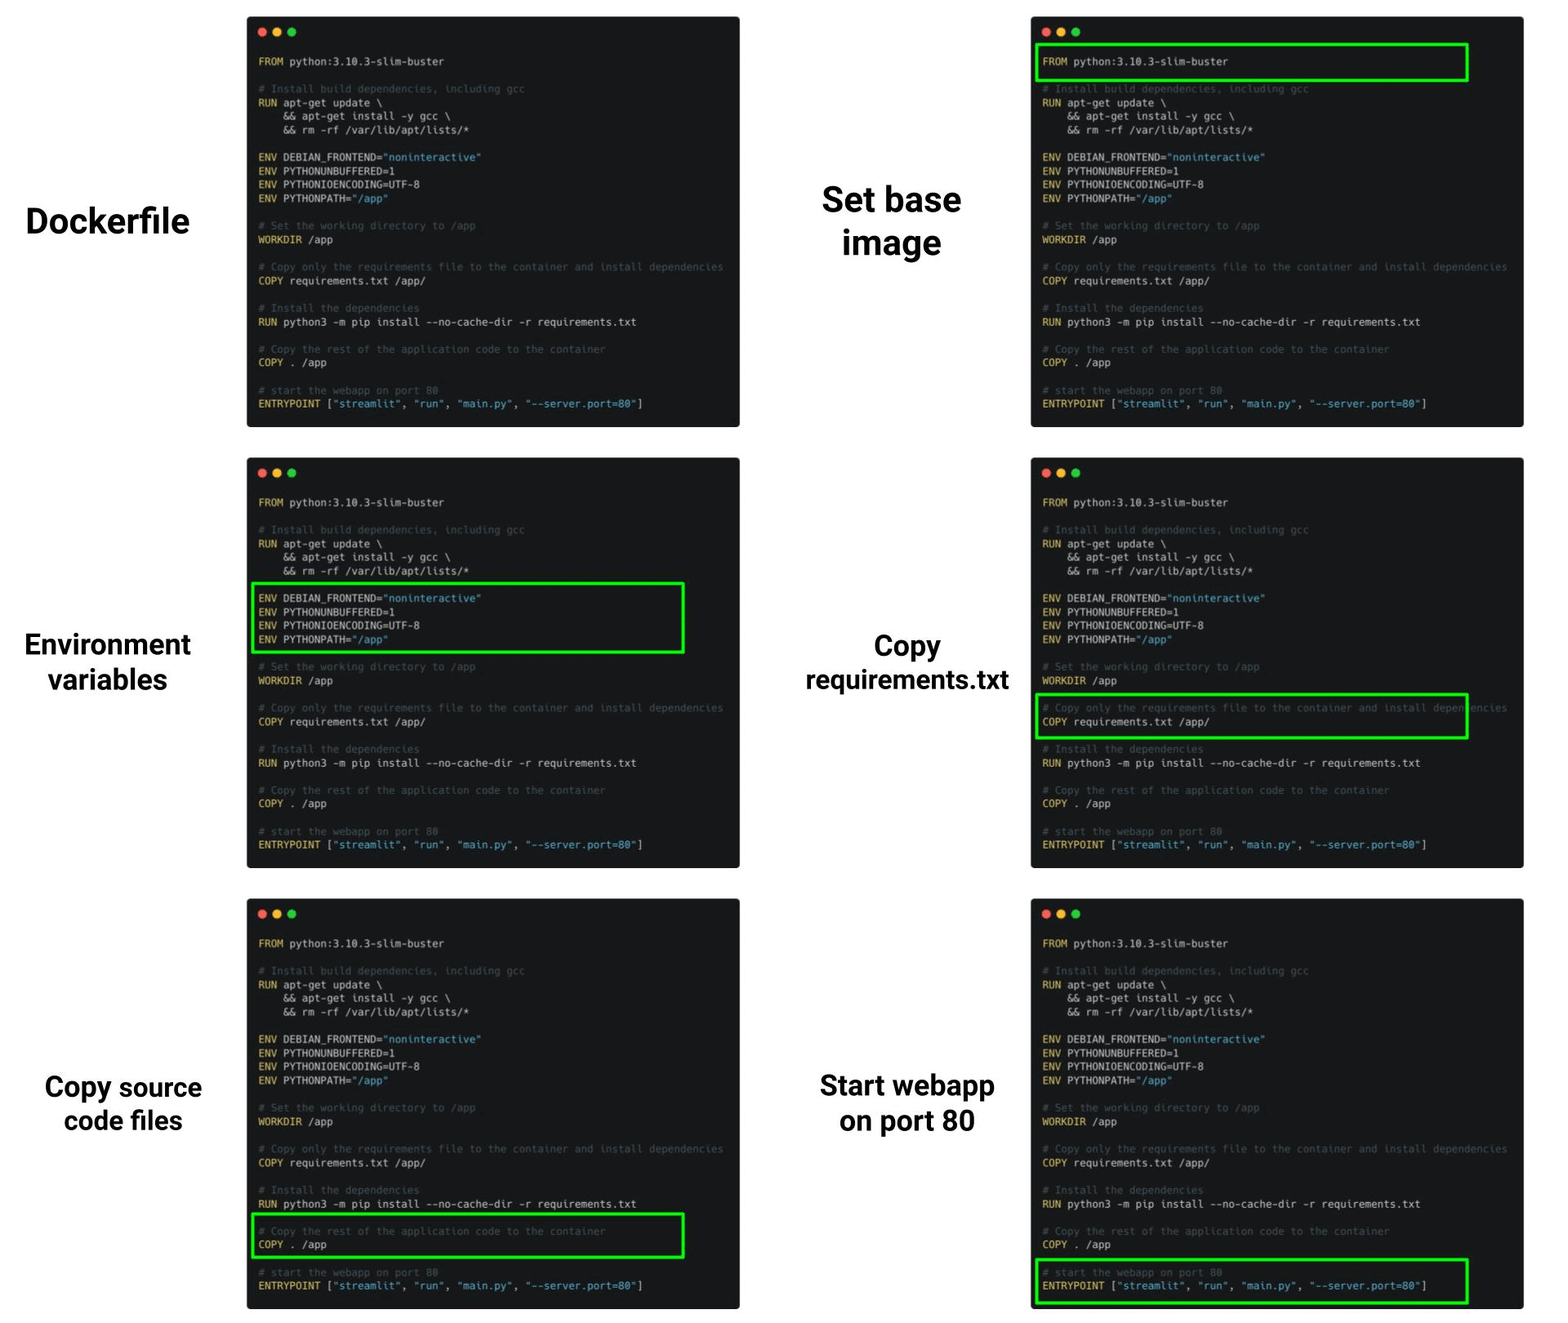
From this Dockerfile you can build your Docker image
$ docker build -t ${DOCKER_IMAGE_NAME} .and run the container locally
$ docker run --env ./.env -p 80:80 ${DOCKER_IMAGE_NAME}where
-
—env ./.env → specifies a file with environment variables, in this case the necessary credentials to communicate with the Hopsworks Feature Store.
-
-p 80:80 → maps port
80on the Docker host to TCP port80in the container.
Once you have a containerized app, you are ready for production.
Because this is the magic of Docker. If it works on your laptop. It also works on production.
BOOM!
and before you leave… I have a present for you.
Wanna learn to build real-world ML systems following MLOps best-practices?
Building Machine Learning Systems with a Feature Store is an upcoming book by Jim Dowling, where you will learn how to design and implement
-
Batch-scoring ML systems,
-
Real-Time ML systems, and
-
LLM systems
following MLOps best-practices.
🎁 Gift
Get early access to the first chapter, for FREE by using this exclusive promo code
➡️ PlBzch1D24
Happy learning,
Talk to you next week,
Pau

